DIY Frozen Christmas Ornament and Party Favor
DIY Frozen Christmas Ornament and Party Favor. One of the hottest trends this holiday season is Frozen. Everywhere you go Frozen is visible. You can’t escape the madness! I have two girls who love Frozen and so there is definitely no escaping. Next week my kids will be getting out for Christmas Break and they love to give their friends a little gift so the girls decided Frozen was the theme. Join me today as I share this beautiful keepsake Christmas ornament and party favor you can create for one or many in a matter of minutes. It’s simple and the Frozen fans around you will thank you.
 Keepsake Ornaments
Every year I love to make my children their own ornament. This year I was at a total loss of what to make for them and then it finally hit me and I decided to make the girls their own Frozen Ornament. Both my girls were squealing with joy and are so excited to have their own handmade Anna and Elsa Ornament.
My oldest daughter loved it so much she asked me if I could make them for the girls in her class for their Christmas Party. By now how much I love making stuff for my kid’s parties and so I couldn’t say no :). I used the same concept from the Skylanders’ Gumball Party Favor Tubes I created for my son’s birthday party and turned them into Frozen Party Favors.
I love the idea of making this ornament for them because it is something they will be able to keep that will remind them of their childhood when they are grown. These are very easy to make and if you follow my SIMPLE STEPS you too can still create these in time for Christmas.
I still have to make ornaments for my two boys and have no idea yet. One is 20 years old and the other is 10 years old and so I am at a loss. I am not too worried as I know it will hit me when I least expect it and will whip it out quickly. Are you like me and work better under pressure?
 Most Important Thing to Remember
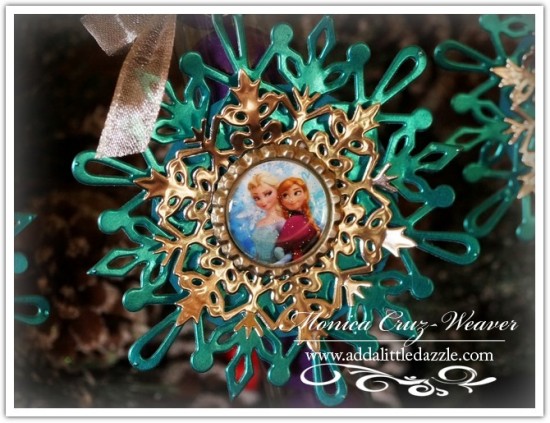
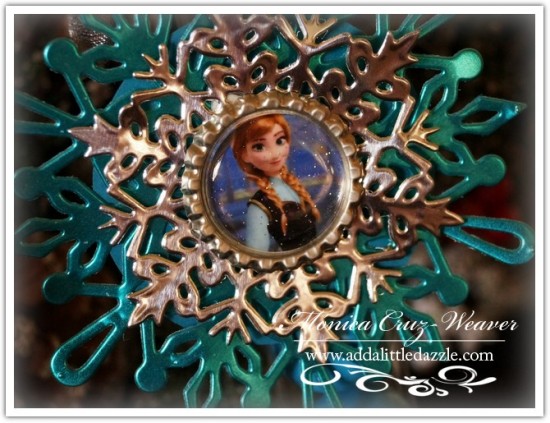
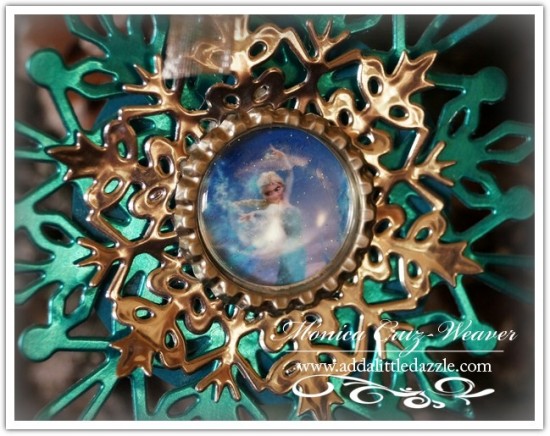
I love making handmade ornaments with Add a Little Dazzle Craft Metal Sheets. Throughout the years, I have learned that the most important step is to create a sturdy background. All you need to do is have some coordinating card stock and Double-Sided Adhesive Sheets. Once you have these two basic items along with your favorite Add a Little Dazzle Craft Metal Sheets, you are on your way to creating a masterpiece.
All you need to do is attach the Double-Sided Adhesive Sheet to the card stock, peel the white film, and then attach the Perfect Peacock Craft Metal Sheets. Then, you need to place the Snowflake Die on it and run it through the Big Shot. This is a very intricate die and as a result you will need a Metal Adaptor Shim. Make sure to check out THIS POST to learn how to use it.
Now one thing I did notice is that in order to create an even better cut I had to add a 6″ x 9″ piece of card stock under the Metal Adaptor Shim. Once I did this and ran my sandwich through the Big Shot, I got a crisp cut and the card stock did not tear.
 Flattened Bottle Caps
To create the center piece of the Frozen Keepsake Ornament I used a Flattened Bottle Cap with Glittered Epoxy Sticker. I found the Frozen character images at Etsy. I purchased the digital file for $1.50 and then had them printed onto 4″ x 6″ photo paper at Walgreens for 39 cents each. Each sheet comes with three sets of five digital images.
Then, I punched it out with my 1″ circle punch, attached it to the center of the flattened bottle cap, and sealed it with an Epoxy Sticker. Then, I simply adhered it with Hot Glue to insure it would remain attached. To create a finished look, I punched out a 2 1/2″ circle from Island Indigo Card Stock and attached it to the back of the ornament. This is the perfect place to write a message and date the ornament for the recipient.
 Party Favor
Since I am creating these ornaments for each girl in my daughter’s classroom, I decided to attach it to a gumball tube to create a pretty presentation that every girl would love.
I included 1″ diameter gumballs (from Party City) in coordinating colors and placed them in these clear tubes. The instructions and links on where to purchase these tubes online can be found in the pdf tutorial below. I have also listed the Add a Little Dazzle Boutique supplies you will need to order to create this amazing ornament.
![]()
Add a Little Dazzle Boutique Supplies Needed:
• Add a Little Dazzle Craft Metal Sheets
• Double-Sided Adhesive Sheets


Yours look prettier than the real ones!
Beautiful snowflake toppers. The turquoise is so pretty.
Beautiful! Love the color Perfect Peacock metal sheets – works wonderfully with that intricate die.
Diana,
I agree Perfect Peacock is a beautiful color. It is one of our best sellers! 🙂
Have a wonderful day! Hugs!
Monica
These are adorable! I might just have to make some myself. For the grand kids of course…maybe, if their good 🙂
Viki B
They are very easy to make! Let me know if you need help getting an order together. Right now we are shipping out same day.
Hugs! Monica
these are fabulous!
Thanks Lynda glad you enjoyed it. We have everything in stock so if you want to make them for Christmas everything will ship out first thing in the morning.
This is just beautiful!! This is the perfect treat for little girls now who love FROZEN!!!
Roberta,
Thanks so much. My girls are #1 fans. Have more Frozen projects coming your way!!! Need to keep those ideas for that beautiful granddaughter of yours. 🙂
Wow! These r so beautiful!
Thanks Donna. Say hi to Anna and Elsa from my girls!
I said hi to Anna n Elsa from your girls.